The sweater effect on nails will dominate winter trends in 2026.

Discover 8 of the trendiest sweater nail looks. See how to create the sweater effect and which colors and patterns will be the hit of winter 2025.
The sweater effect will dominate winter nail trends in 2026
Discover 8 of the trendiest sweater nail looks. See how to create the sweater effect and which colors and patterns will be the hit of winter 2025.
What are sweater nails and where did the sweater effect come from?
Sweater nails are a winter trend that has been one of the most popular seasonal nail designs for several years. The sweater effect on nails faithfully recreates the texture of knitwear:
- braids,
- knit stitches,
- twists,
- geometric patterns.
All these designs look like they were taken straight from a favorite, cozy sweater.
This style is loved for its naturally “cozy” vibe, a 3D effect, and the huge creative freedom you get when working with raised texture.
How to do sweater nails step by step at home
Creating sweater nails isn’t difficult, but it does require precision and the right product consistency. Here’s a proven guide:
-
Step 1: Prep the nail plate
Shape the nails, push back the cuticles, and apply a hybrid base; cure in a 48W LED lamp. -
Step 2: Apply color
Choose your favorite winter shade – nude, white, dusty pink, gray – and apply 1–2 thin layers of hybrid polish. Cure. -
Step 3: Create the pattern
Using a thick nail art gel or acrygel, draw lines, loops, stripes, or “braids” with a fine brush. -
Step 4: Sprinkle with acrylic powder
Before curing the design, sprinkle it with acrylic – this gives the signature textured knit finish. -
Step 5: Cure and dust off
Cure for 60 seconds, then gently remove excess powder with a soft brush.
That’s it – your sweater nails are ready!
Winter manicure inspiration: sweater nails step by step
Classic nude sweater nails – a soft knit total look, step by step
Effect: matte beige nails with a raised sweater pattern on 1–2 nails.
Step by step:
-
Nail prep. Shape the nails, push back/clean up the cuticles, buff the nail plate. Cleanse and dehydrate with cleaner.
-
Base and color. Apply a thin layer of hybrid base, cure (approx. 60 s). Apply 1–2 thin layers of beige or nude hybrid polish, curing each layer.
-
Prep for the sweater effect. Apply a matte top coat to all nails and cure (60 s). Do not wipe – matte tops usually don’t require cleansing.
-
Drawing the sweater pattern. Use a thick nail art gel in a shade close to the base color (e.g., the same nude). With a fine brush, draw on the selected nail:
- in the center – a “braid” (two parallel lines connected with diagonal strokes),
- on the sides – straight lines, dots, or small “X” shapes.
Make the lines slightly thicker so the 3D effect is visible.
-
Acrylic sprinkle + curing. Before curing, generously sprinkle the design with acrylic powder. Tap off the excess gently. Cure for 60 s.
-
Final clean-up. After curing, brush off excess acrylic with a soft brush. Done – a matte, 3D “sweater” effect without an extra top coat on the design.
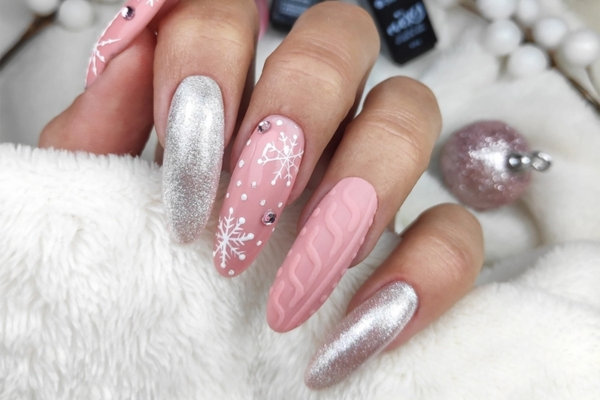
Sweater French with an accent – minimalist knit on the tips
Effect: classic French (sheer base + subtle tip), with a raised “sweater” texture on the tip of 1–2 nails.
Step by step:
-
Nail prep: shape the nails (almond or rounded square – your choice), clean up cuticles, buff the nail plate. Dehydrate with cleaner.
-
Base + sheer base color: apply base and cure (60 s). Apply 1–2 thin layers of sheer pink/milky white (perfect under French), curing each layer.
-
French + matte: with a fine brush, paint classic tips – white or light beige – and cure. Apply matte top on all nails (also on the French), cure, do not wipe.
-
Sweater pattern on the tip: on the chosen nail (e.g., ring finger), draw the pattern only within the French tip area:
- use thick nail art gel to create 2–3 horizontal lines or mini braids across the tip,
- optionally add tiny dots between lines for a knitwear effect.
Be careful not to go beyond the French line – it looks the most elegant that way.
-
Acrylic + curing: before curing, sprinkle with acrylic powder. Tap off excess, cure 60 s. After curing, brush away remaining powder.
This gives you two different sweater styles:
- a total look for cosy vibe lovers,
- a more minimalist option – perfect for work or holiday gatherings where you want it stylish, but not too much.
The best colors for the sweater effect – winter picks
The sweater effect looks best in shades associated with winter and soft knitwear. The trendiest tones are:
- nude – a classic, perfect for minimalist knits,
- white and ivory – the cleanest “snowy” look,
- light gray and ash – elegant Scandinavian vibes,
- dusty pink – romantic and subtle,
- mint, baby blue, lavender – winter pastels,
- browns and cappuccino – warm “coffee” nails.
Darker shades also work beautifully – especially navy and bottle green – but the 3D effect is more subtle.


What products do you need for a sweater manicure?
To create a long-lasting sweater effect, you’ll need:
- a thick nail art gel or acrygel,
- a fine detail brush,
- acrylic powder for sprinkling,
- a base color of your choice,
- a matte or glossy top coat,
- a 48W LED lamp,
- cleanser and dehydrator.
Thick, self-leveling products create the most even 3D effect.
How to make the sweater effect durable and long-lasting
For sweater nails that last up to 3 weeks, remember:
1. Proper curing
Every 3D design must be cured for the full 60 seconds.
2. Acrylic powder
This keeps the design from collapsing or flattening.
3. No top coat on the design
If you want a textured finish, don’t apply top coat over the raised lines – only over the base layer.
4. Seal the free edge
This helps prevent chipping and lifting.
Do sweater nails work on short nails?
Absolutely! For short nails, go for:
- thin, delicate knit patterns,
- light colors (white, nude, pink),
- vertical designs to visually elongate the nail.
Avoid very wide, raised lines – they can make the nail look shorter.
How to combine sweater nails with other winter trends
Sweater nails pair beautifully with other winter effects:
- sweater French – matte base + sweater on the tip,
- glitter on one accent nail,
- snowflakes, stars, snow dots,
- matte finish – highlights 3D,
- pastel ombre,
- gold details for elegance.
It’s the perfect manicure for the holidays, winter photoshoots, and ski season.
The trendiest patterns and textures in sweater manicure
This season’s favorites include:
- classic braids,
- twisted knits,
- geometric grids,
- minimalist stripes,
- a mix of matte and shine,
- a “fluffy sweater” effect thanks to acrylic.
The most striking looks combine multiple textures on one hand.
3D sweater nails – how to do them with gel or acrylic
If you want a bold, highly raised 3D look:
- Use a very thick gel or acrygel.
- Build the design in layers – line over line.
- Sprinkle each layer with acrylic and cure separately.
- Finish by brushing away excess powder.
This is the best technique for rich, “knit-like” patterns.
The most common sweater nail mistakes (and how to avoid them)
- Product too runny
It makes the design spread and flattens the 3D effect – choose thick gels. - Curing too short
The design won’t set properly – cure for the full 60 seconds. - Lines too thick
They can look heavy – use a fine brush and keep details refined. - Skipping acrylic powder
Without it, you won’t get the matte, textured finish. - Applying top coat over the lines
This flattens the texture – top coat only the base color.
Sweater nails – a winter must-have
Sweater nails combine warmth, winter aesthetics, and beautiful detail. They’re versatile, stylish, and offer endless possibilities – from minimal designs to full 3D nail art. With the right products and a bit of patience, you can create them at home too.
Dreaming of a manicure that mesmerizes with depth and a unique 3D light effect? See how to create a cat eye manicure. And don’t forget winter hand care – check our cuticle oil ranking.


